
There are several reasons why your legacy VMs running in the cloud may benefit an in-place OS upgrade: end-of-support, compatibility, or enhanced security. It’s always recommended to deploy a new server and migrate the app whenever possible, but many organizations are carrying technical debt that prevents app migration or refactoring to another service. Some examples of this might be a legacy application with specialized configuration or something along the lines of a Certificate Authority, Configuration Manager, etc. It may be more practical to upgrade the server in-place, even though it might not necessarily be your first (or best) choice. And yes, it is supported!
In-place upgrades aren’t really a big deal for physical/virtual servers that you have local access to, but what about Azure, AWS, or Google? They only provide RDP/SSH access to a booted system, making OS work a bit of a challenge. You could migrate a cloud system back to on-prem temporarily for an in-place upgrade, then migrate it back when finished, but that could be a challenge with bandwidth, downtime, and technical requirements. If you run OS install media on a cloud server without the necessary commands, you may find your server inaccessible and stuck at an OOBE screen afterwards. Microsoft and AWS provide guidance for in-place upgrades, but it’s really as simple as using the following command with Windows Server setup media:
setup.exe /auto upgrade /dynamicupdate disable
The “/auto upgrade” switch will skip the OOBE experience and any GUI inputs after install, while “/dynamicupdate disable” will prevent additional updates from installing during the upgrade process, which often prevents failures.
A few tips from experience:
- Always, always, take a backup before starting the in-place upgrade process. A snapshot or fresh backup in Azure can be a lifesaver.
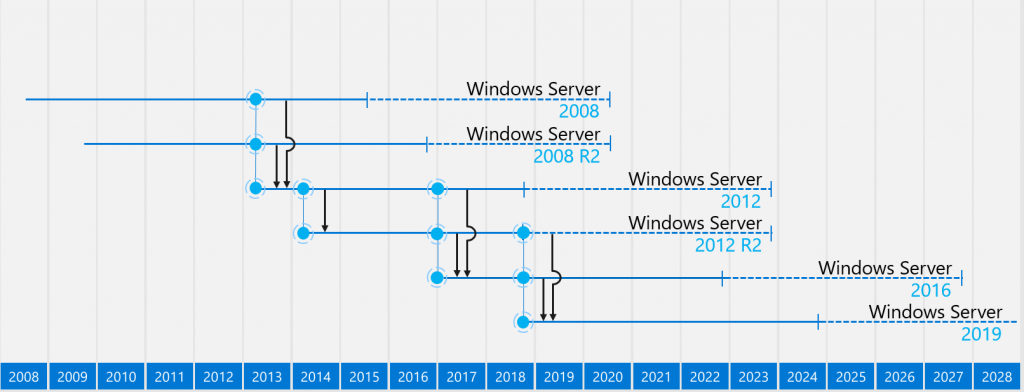
- Check the available upgrade paths (image above)… you might be able to skip ahead by nearly a decade.
- Remember how the cloud is elastic? You can temporarily increase VM resources during the upgrade process to speed things up at a marginal cost!
- You can run the setup media directly from your server’s local drive. The Microsoft documentation linked above instructs you to attach a new disk to the system, but this isn’t necessary as long as you have enough free space for the upgrade.
- Use Boot Diagnostics in Azure to pull screenshots and monitor the upgrade process of your VM once it has rebooted. In AWS, you can grab this through an Instance Screenshot.
- These upgrades take hours, potentially days, on systems with a large amount of files. Remember that disk in the cloud just isn’t that fast by default, and an upgrade to a premium disk might be worth it.
- Upgrading a legacy system that has been running for years always introduces potential failure. Running these commands from elevated command prompt beforehand may help clean up the filesystem and system files:
- sfc /scannow
- dism /online /cleanup-image /restorehealth
- chkdsk /f (and reboot)
- The following two commands can be helpful if the in-place upgrade fails the first time. They will clean out the local security policy and group policy store. Just reboot after running. You can also make a backup of both, if needed:
- del C:\windows\system32\GroupPolicy
- secedit /configure /cfg %windir%\inf\defltbase.inf /db defltbase.sdb
- Don’t forget to patch afterwards. Install media will not include the latest security updates.
- You may need to reinstall supporting software afterwards like AV, Azure extensions, etc.
- You can automate this solution using a program or task sequence in Configuration Manager with the command above, but remember that every system should be monitored individually for success. Expect a higher failure rate than typical deployments, especially coming from Server 2012 R2.